DisplayLink Docking Station for MacBook M1
DisplayLink Docking Station
displaylink driver docking station
triple display for macbook
docking station for macbook
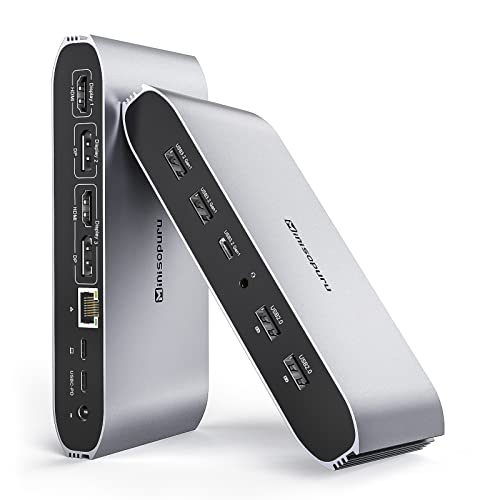
Minisopuru 13-in-1 DisplayLink Laptop Docking Station for MacBook M1/M2/M3/Windows/Chrome OS |DS808
usb c hub macbook pro
macbook usb c hub
best usb c hub macbook pro
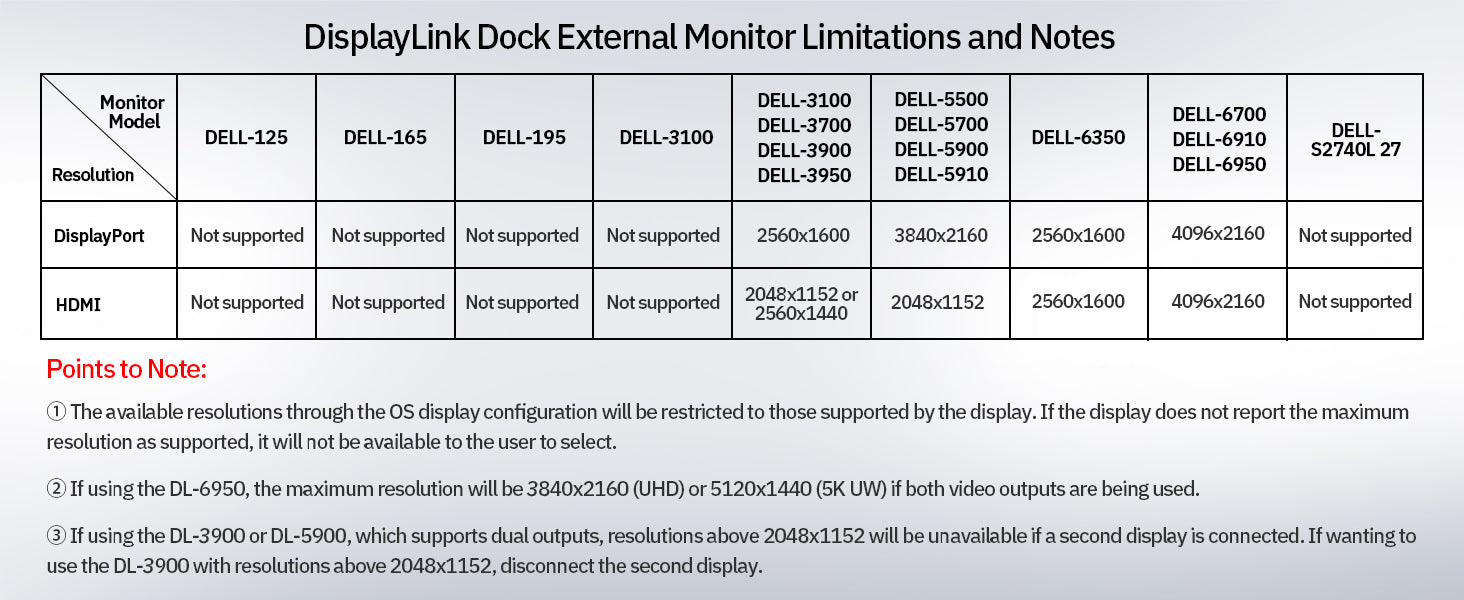
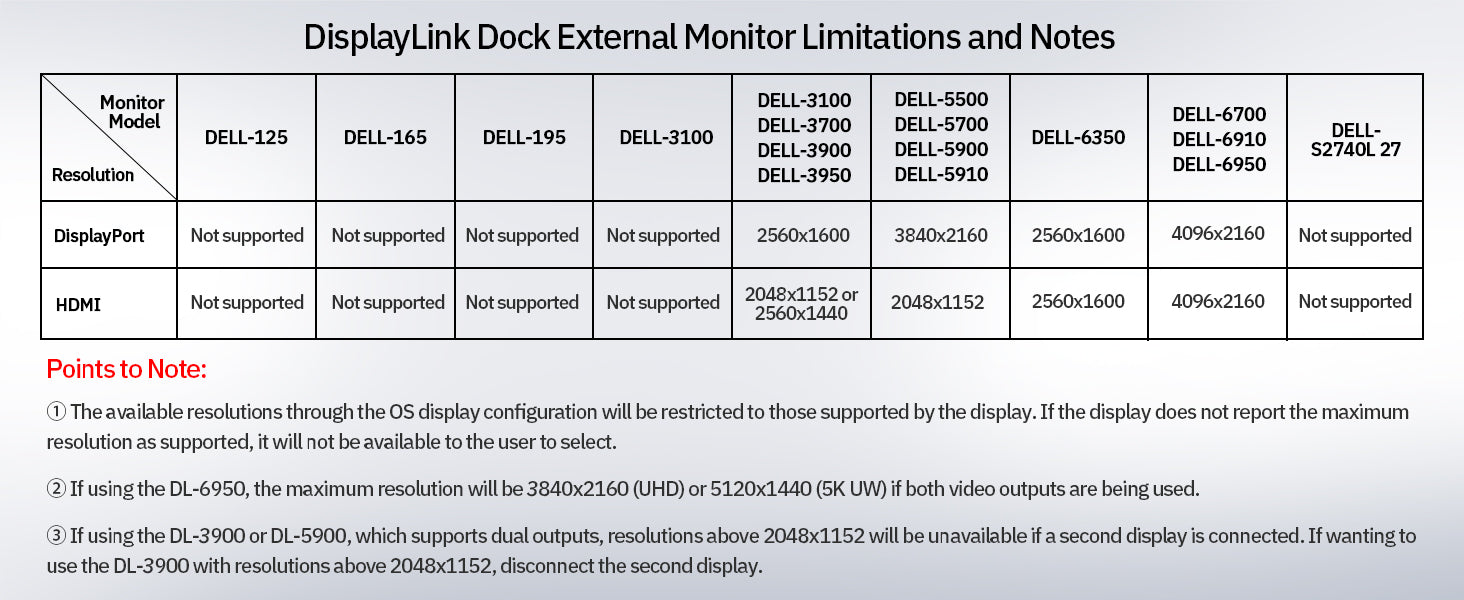
displaylink dock notes

Hot Deal
Minisopuru 13-in-1 DisplayLink Laptop Docking Station for MacBook M1/M2/M3/Windows/Chrome OS |DS808

Sale priceRp 2.310.000,00 IDR Regular priceRp 3.300.000,00 IDR
Save 30%

Get discount code: Xmas15  Save: 15%off

Ends on December 25th, Discounts cannot be combined

Shipping calculated at checkout.

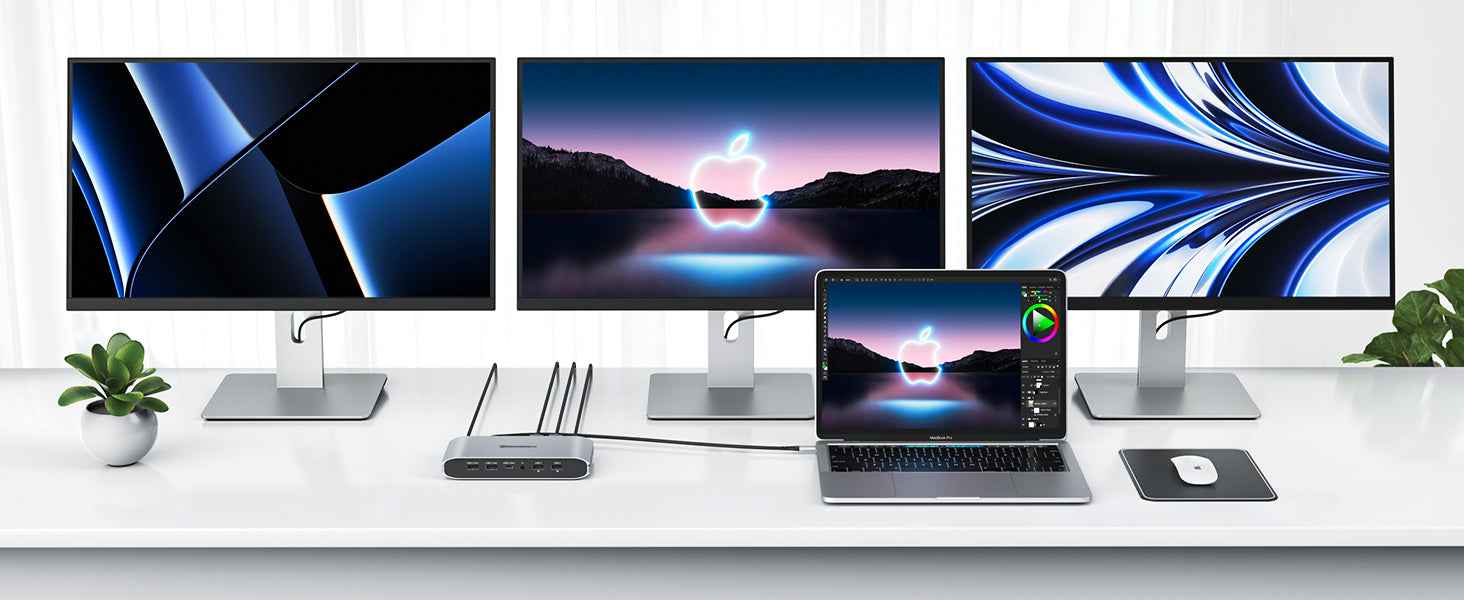
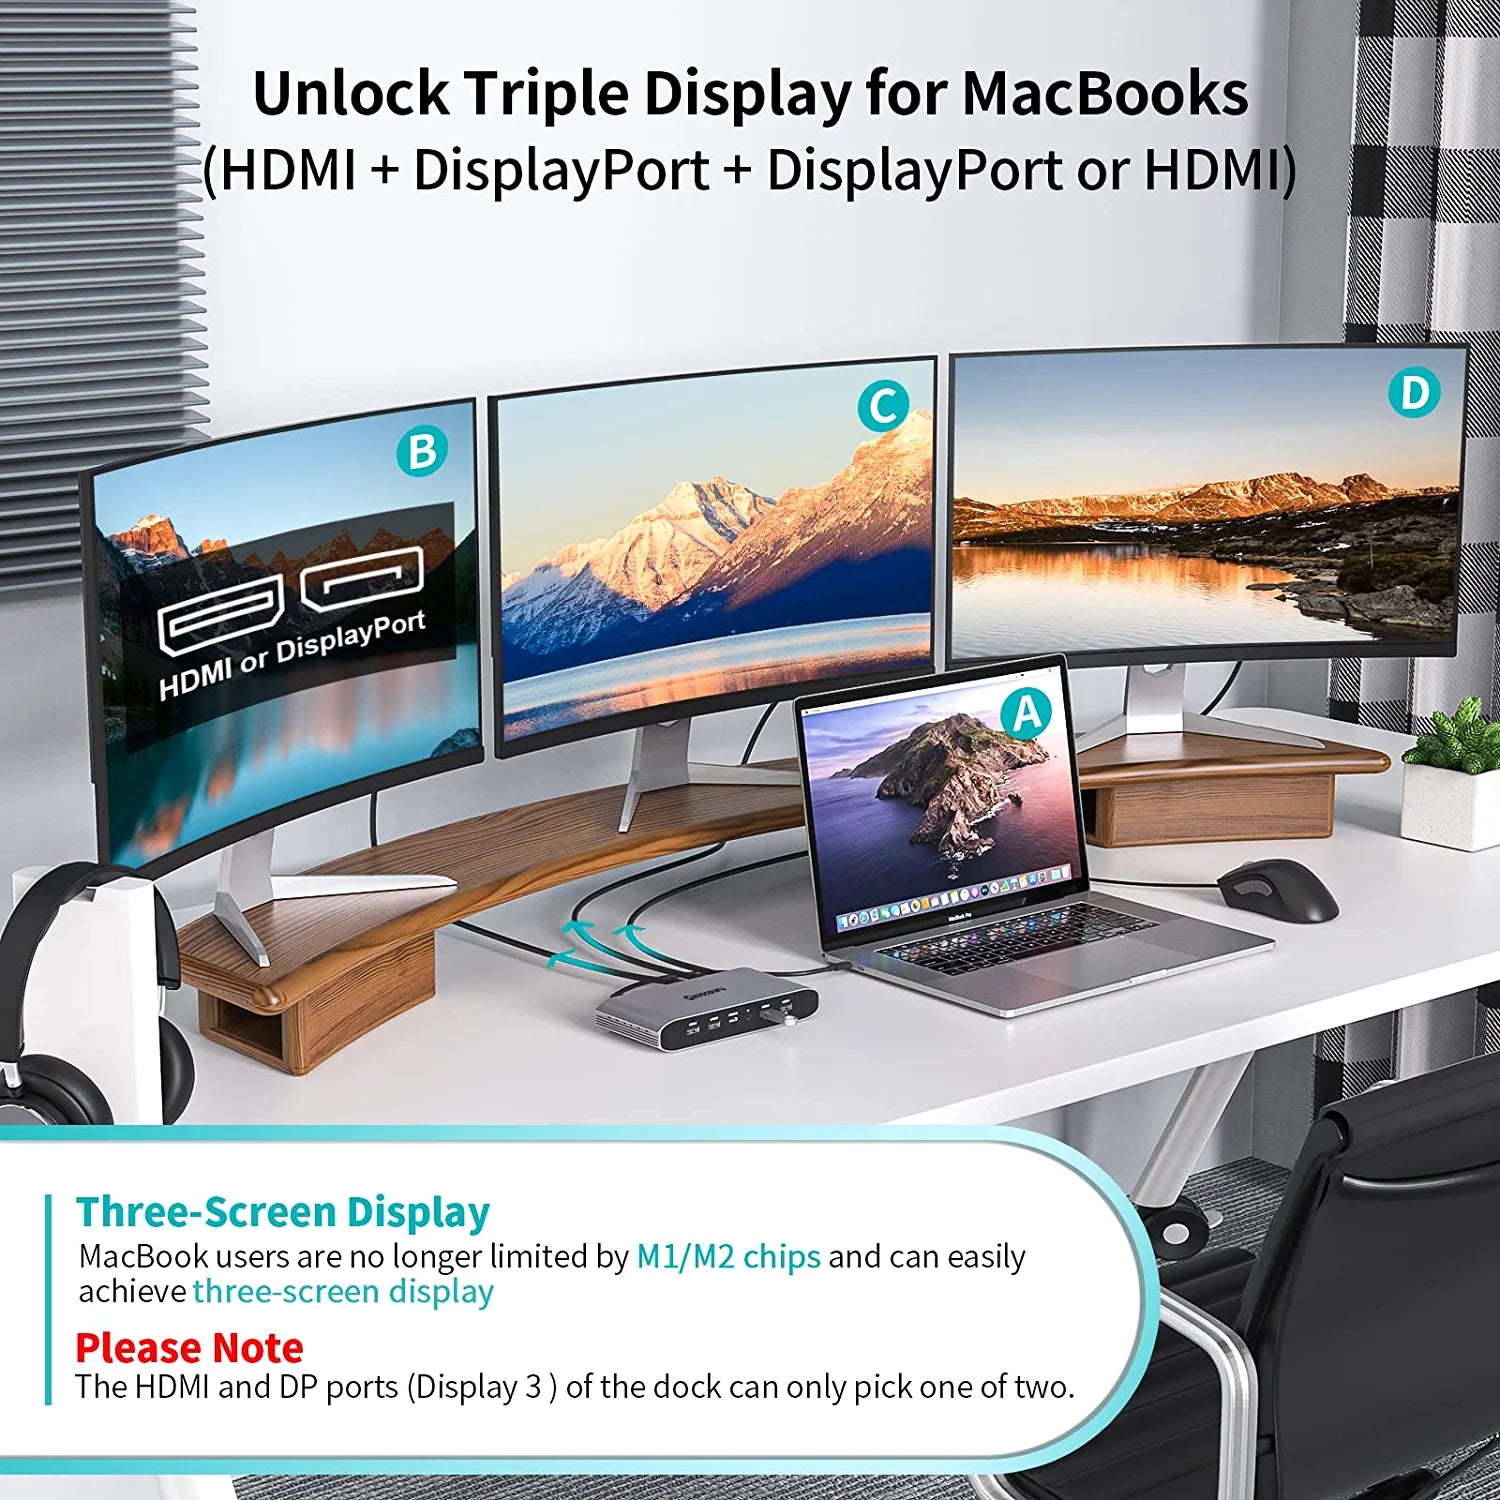
Multi-Monitor Solution:Easily break free from the limitations of the MacBook M1/M2 with the plug-and-play DisplayLink driver, allowing for up to three displays for versatile multi-scenario use. Compatible with Windows 11, 10, 7, 8.1, Chrome OS, Ubuntu, and Android.

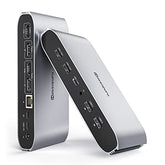
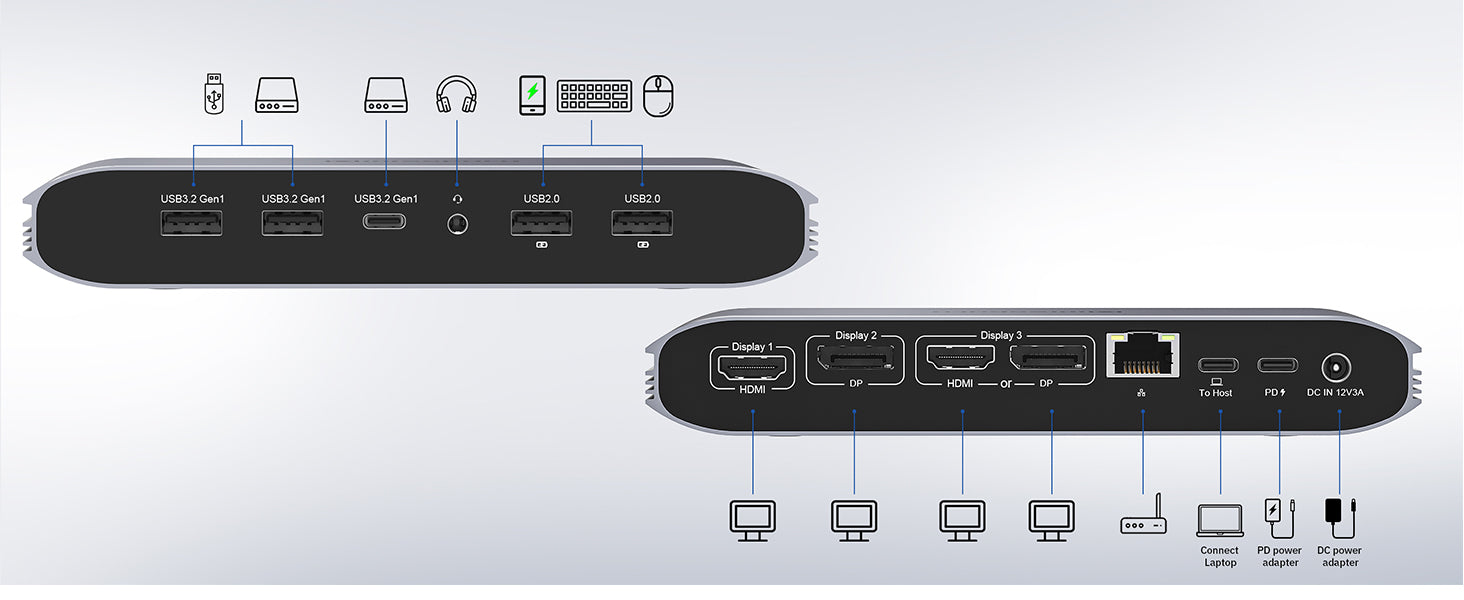
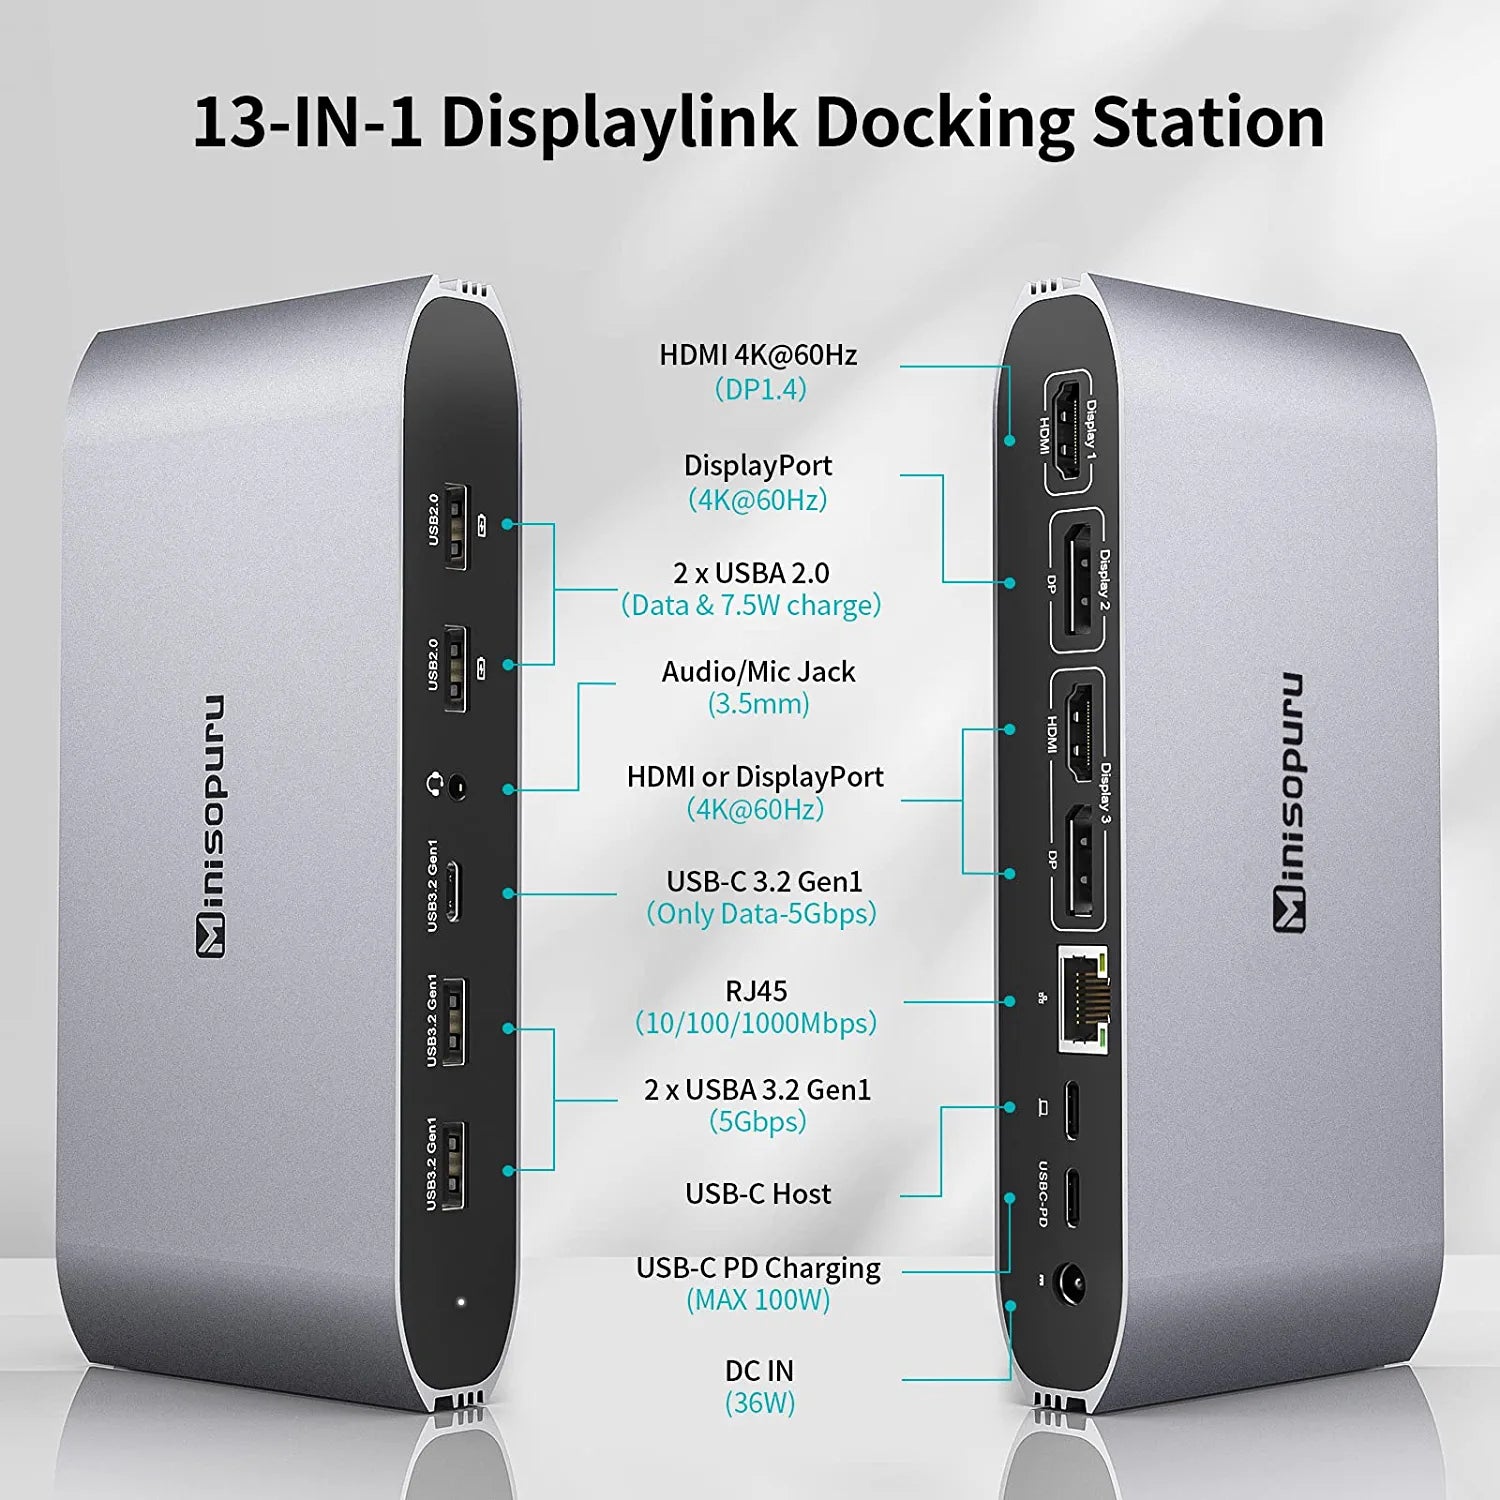
Extensive Port Expansion:Transform a single USB-C port into 12 ports: 2 HDMI, 2 DisplayPort, 2 USB-A 3.0, 3 USB-C 3.2 Gen1, a 100W USB-C charging port, 2 USB 2.0, Gigabit Ethernet, and a 3.5mm audio/mic jack. Includes a 59-inch power cord and a 36W adapter.

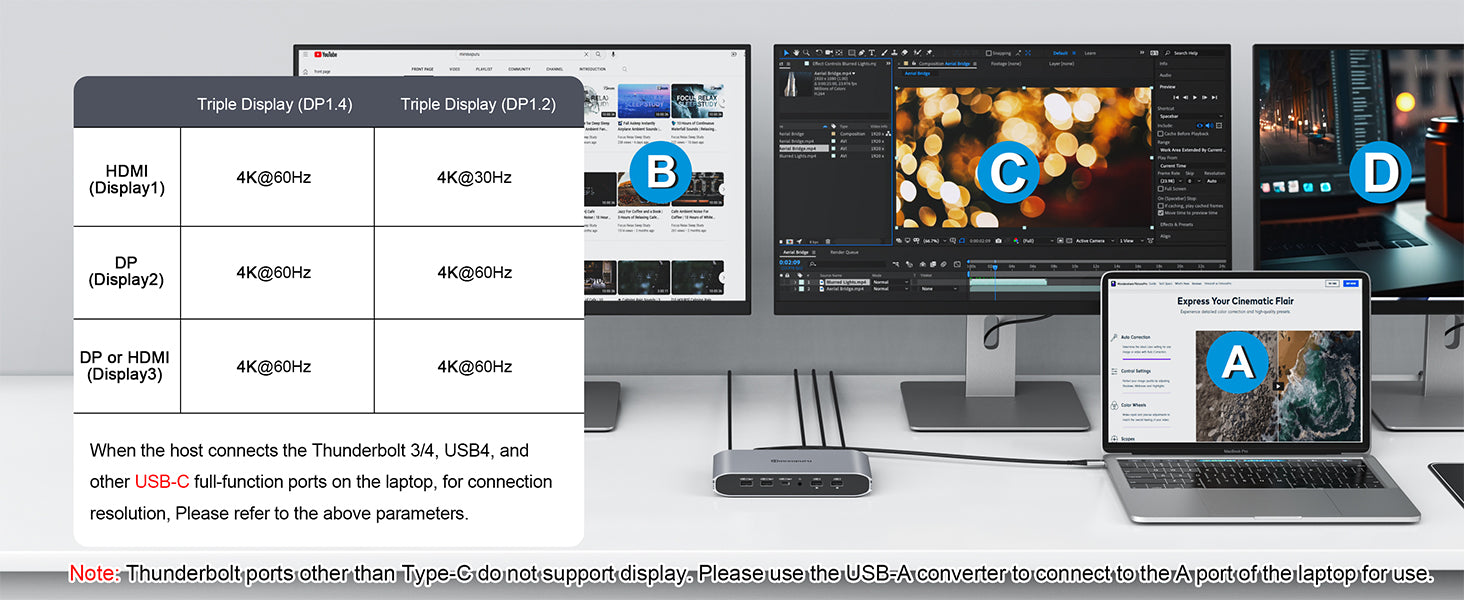
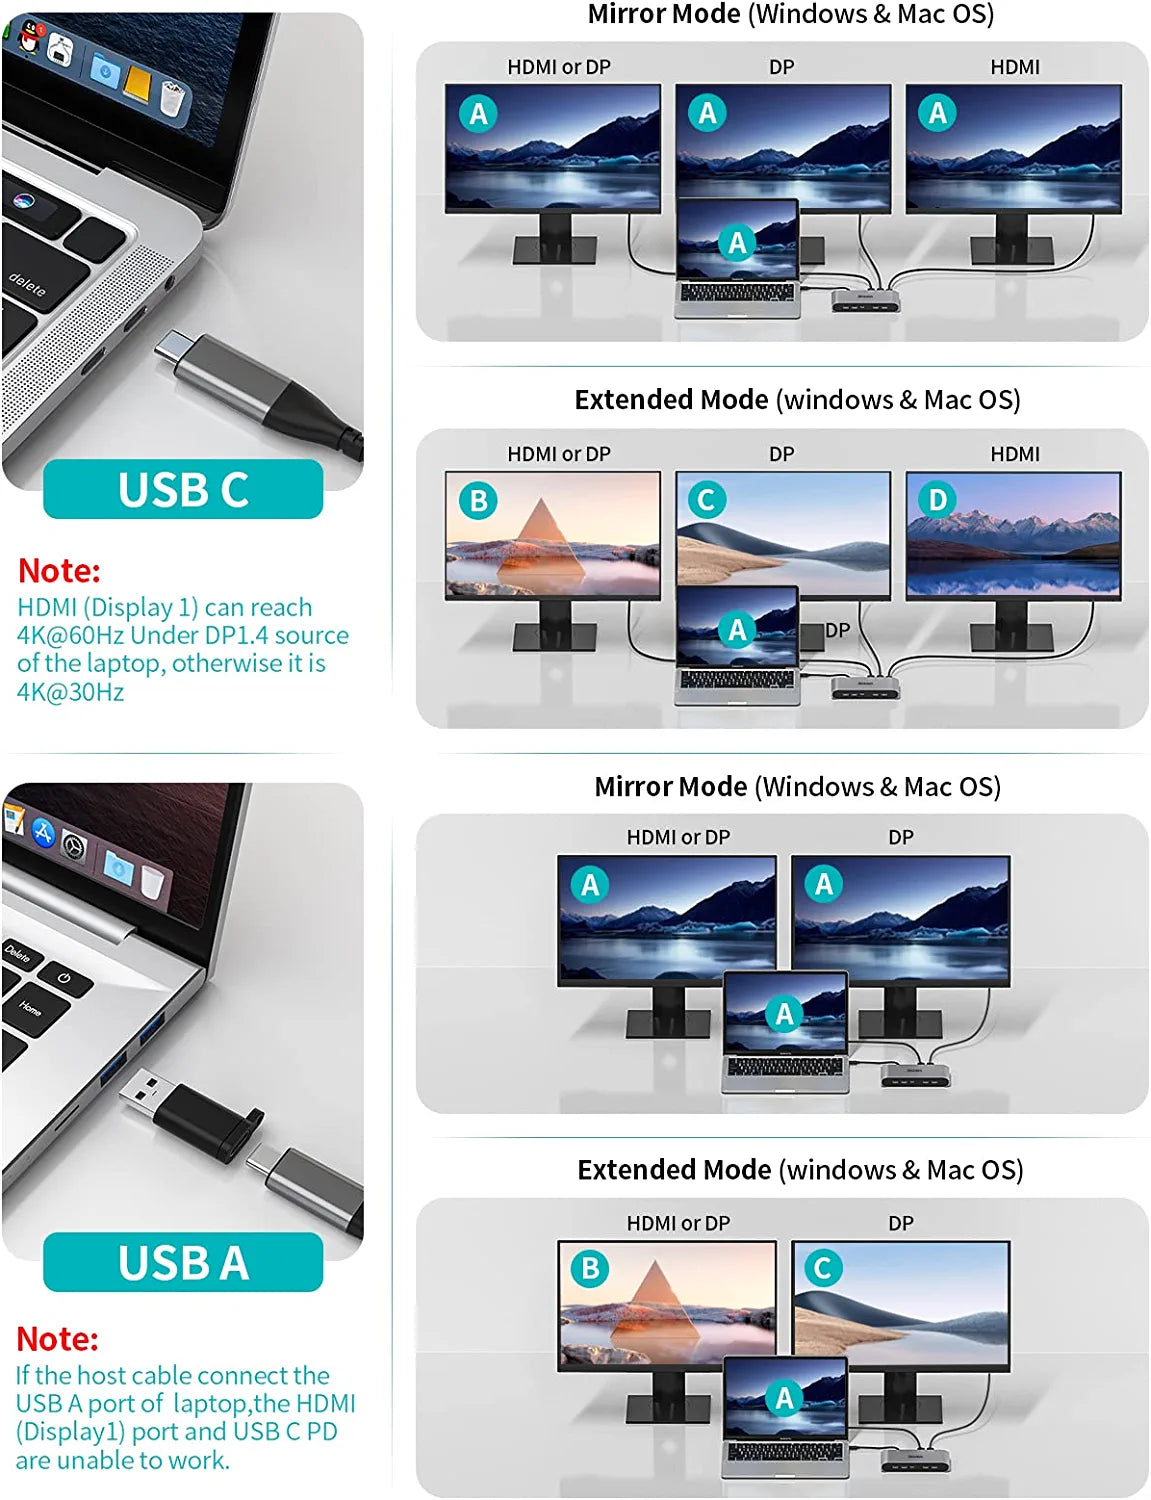
4K Triple Display Support:Compatible with both USB A and USB C laptops, connect to Thunderbolt 3/4 and USB4 ports to achieve three different displays at up to 4K@60Hz. Note: HDMI and DP ports cannot be used simultaneously.

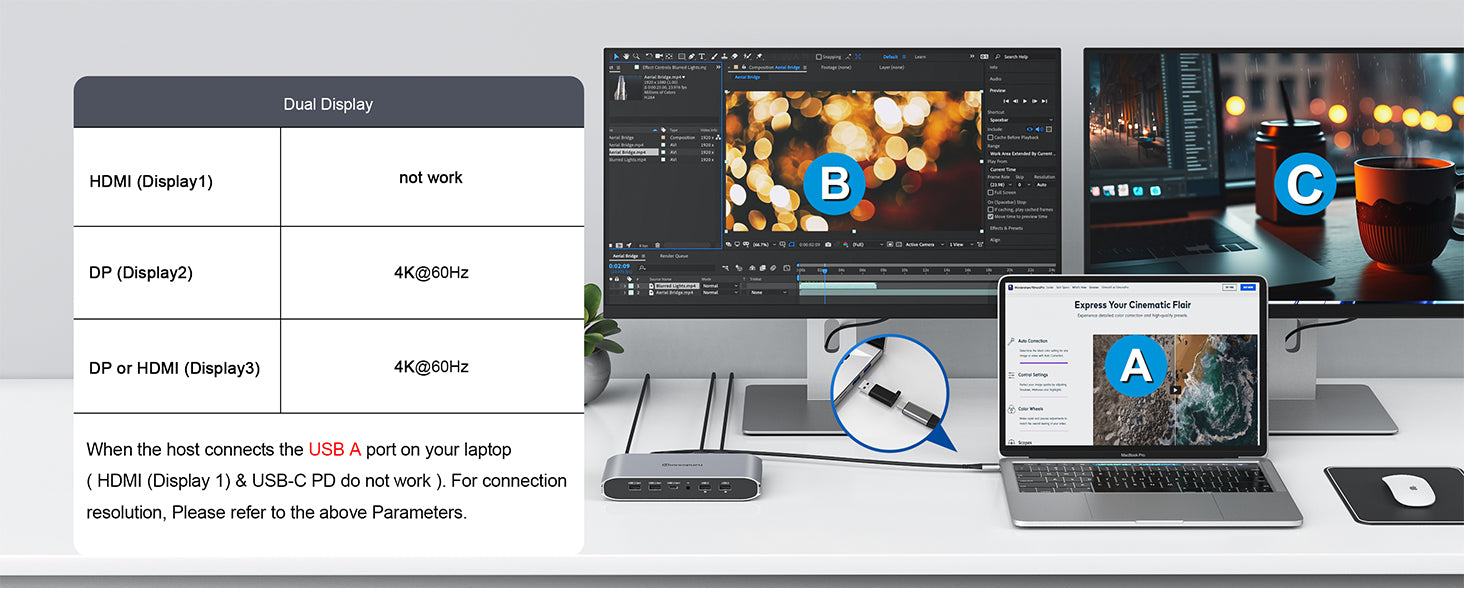
USB A Dual Display Solution:If you prefer not to use the USB C port, connect via the USB A port for dual display functionality, supporting DP and HDMI at 4K@60Hz. Note: HDMI (Display 1) and USB-C PD cannot work simultaneously when connected via USB A.

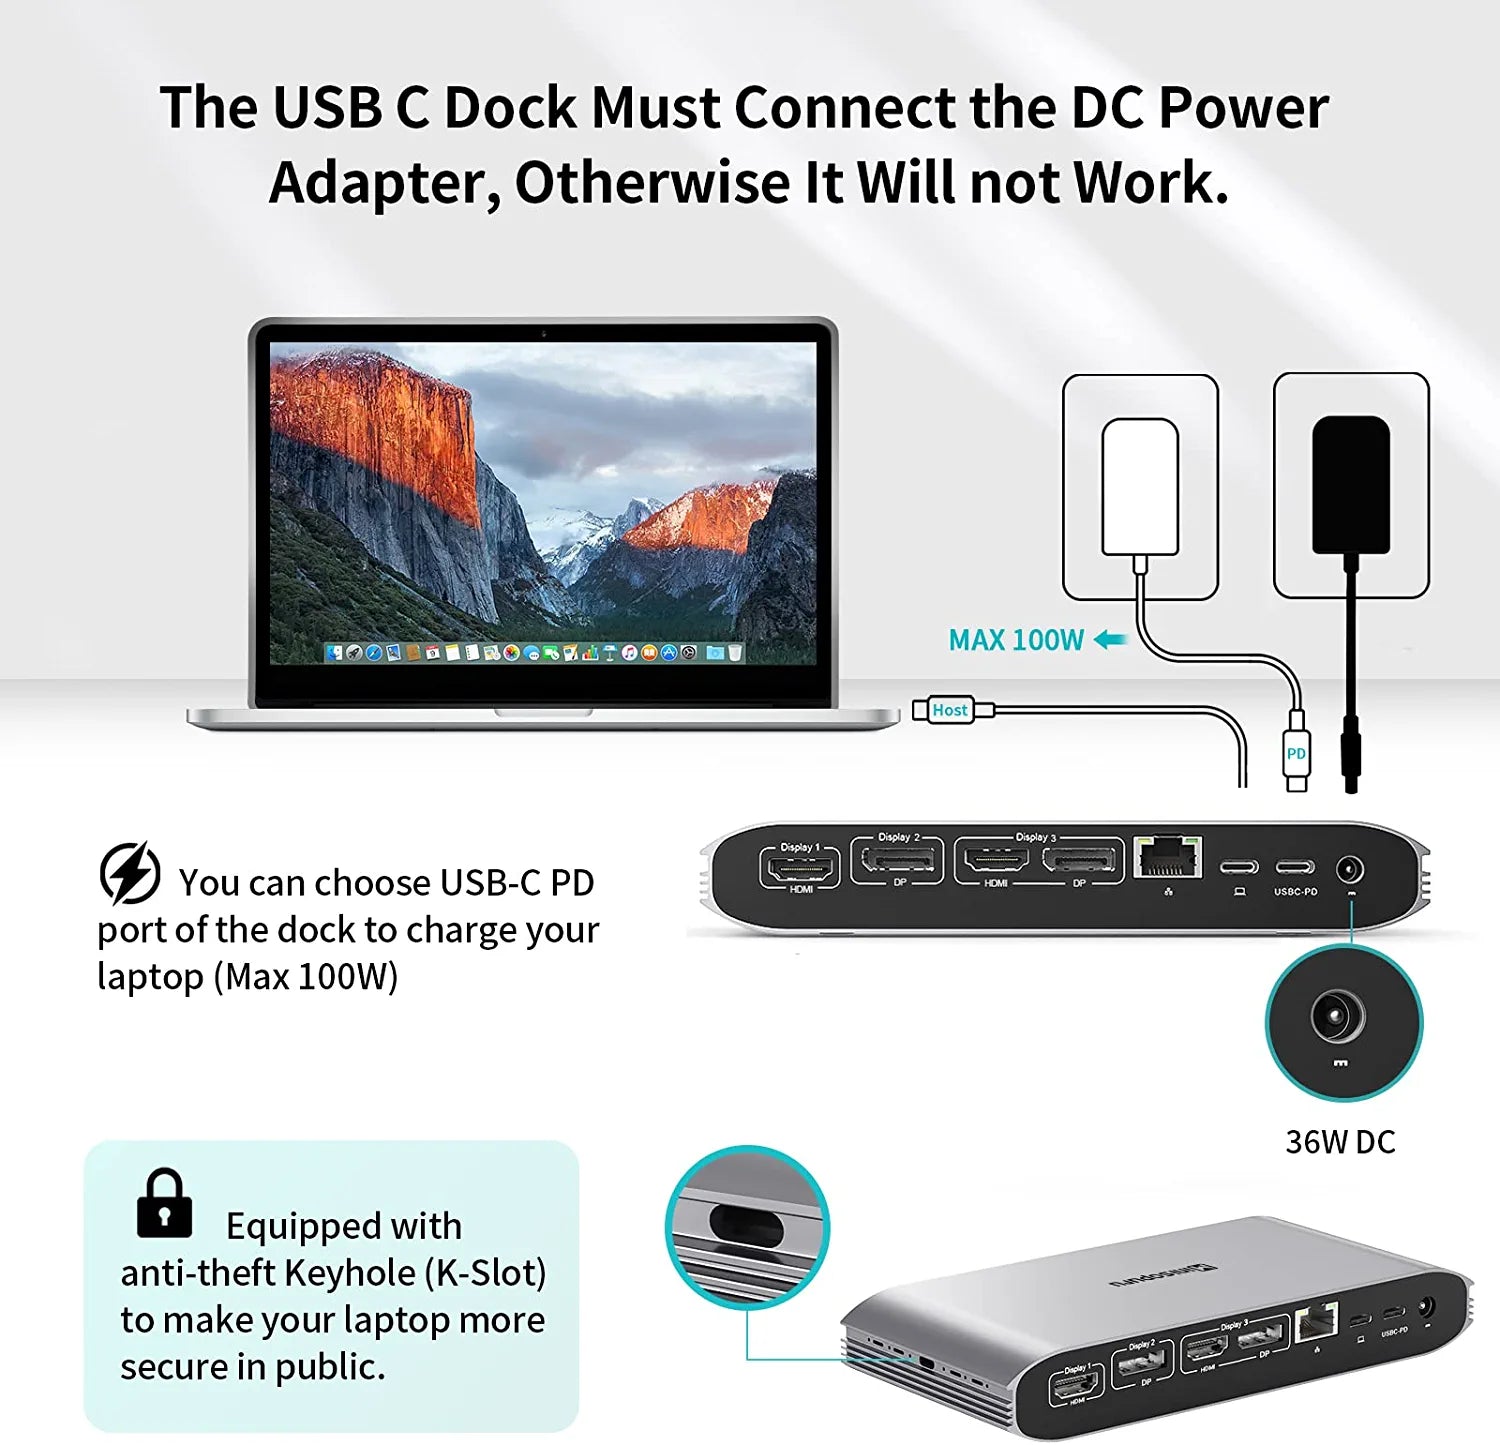
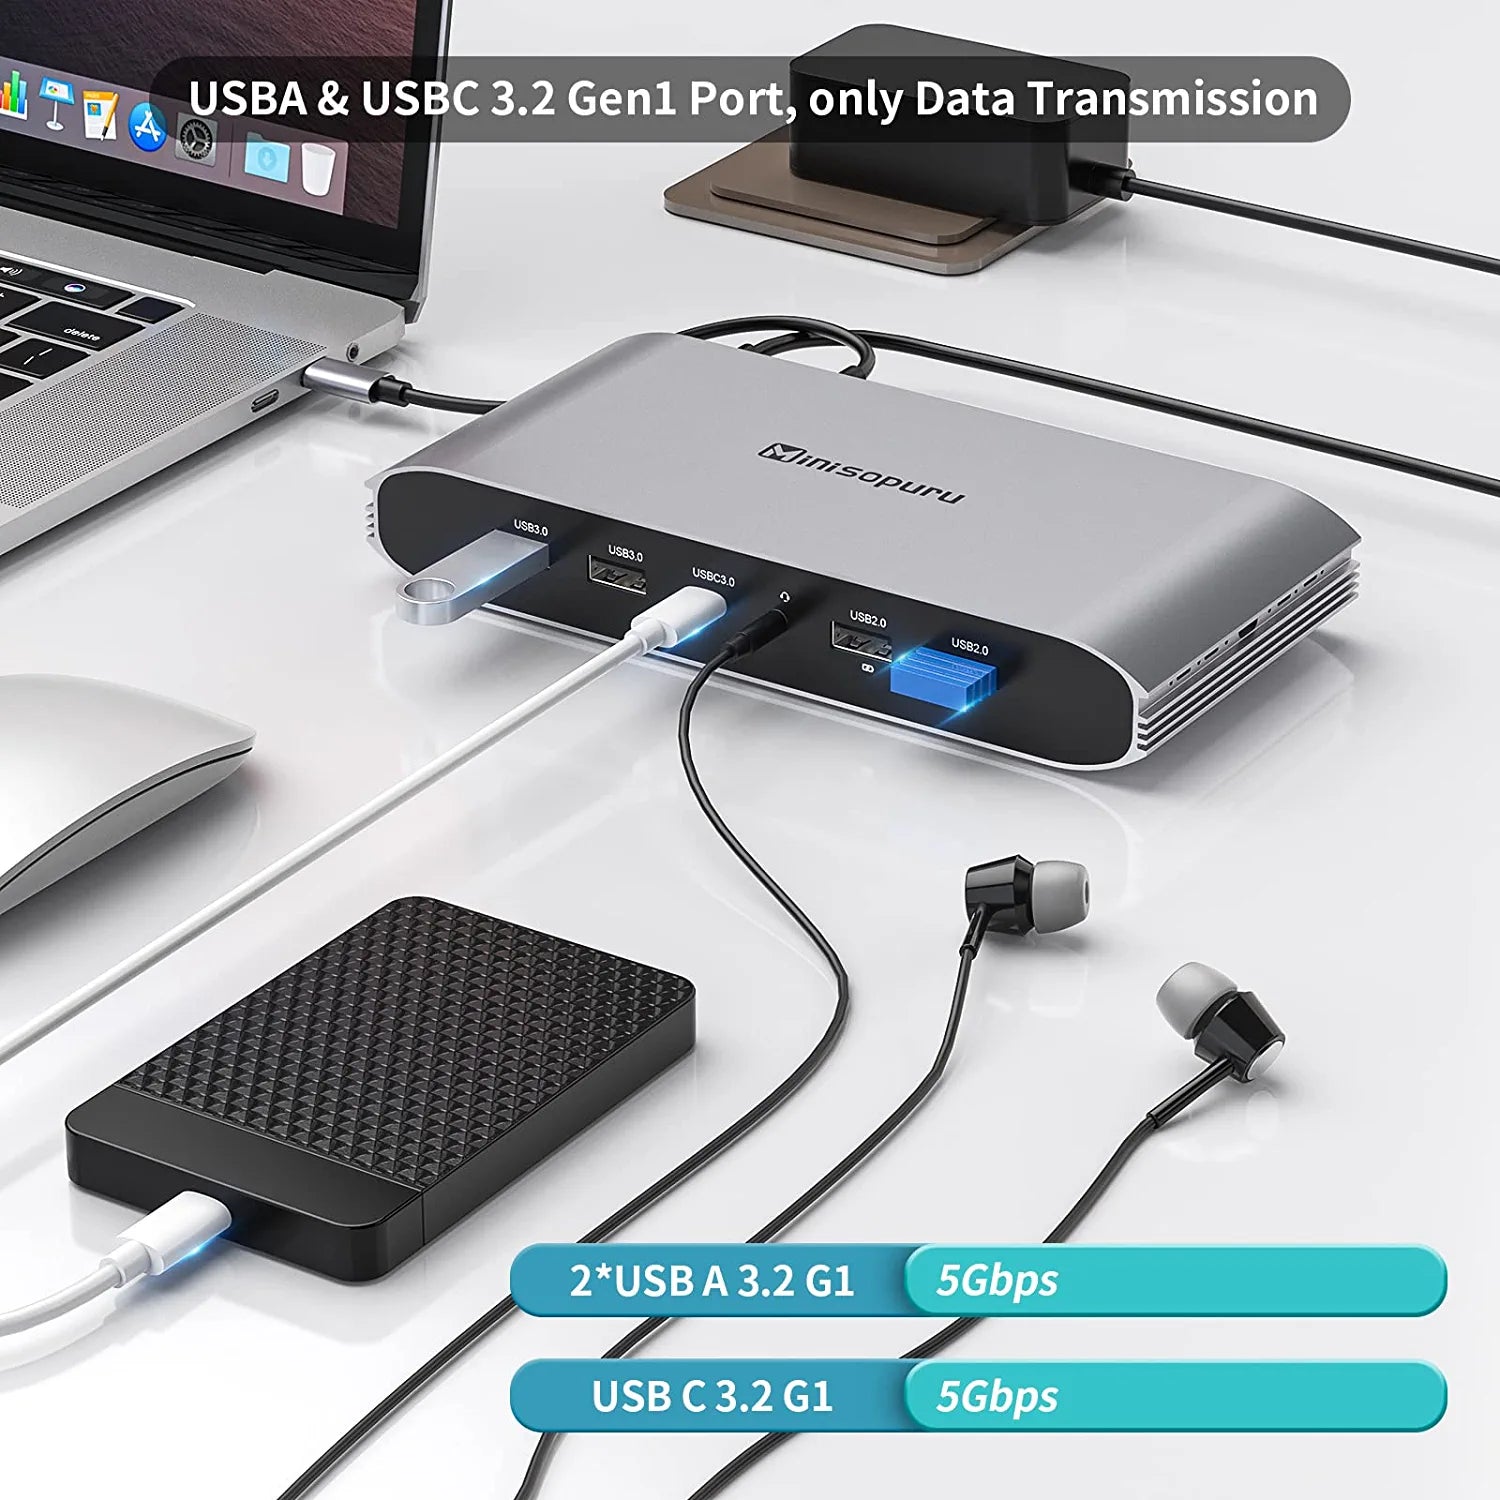
Efficient and Stable USB Hub:Featuring Gigabit Ethernet and two 5Gbps USB-A 3.0 ports alongside a 5Gbps USB-C 3.2 Gen1 port, ensuring fast and stable network connectivity and file transfers. Two USB 2.0 ports are perfect for keyboard and mouse connections. The anti-theft design and 100W USB-C charging port offer peace of mind in public spaces.

Size:EU adapter
Quantity:
Pay with Ease
American Express Apple Pay Google Pay Mastercard PayPal Shop Pay Union Pay Visa

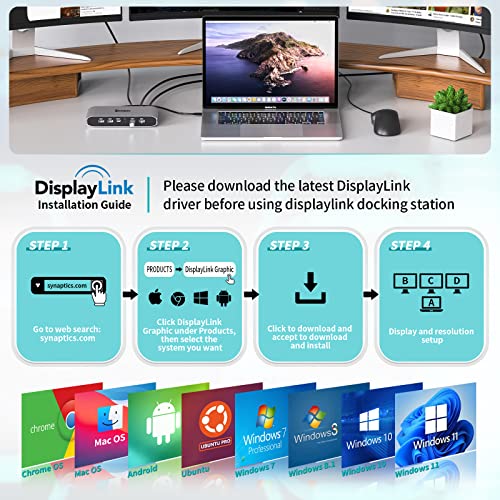
How to Download and Install Displaylink Driver?

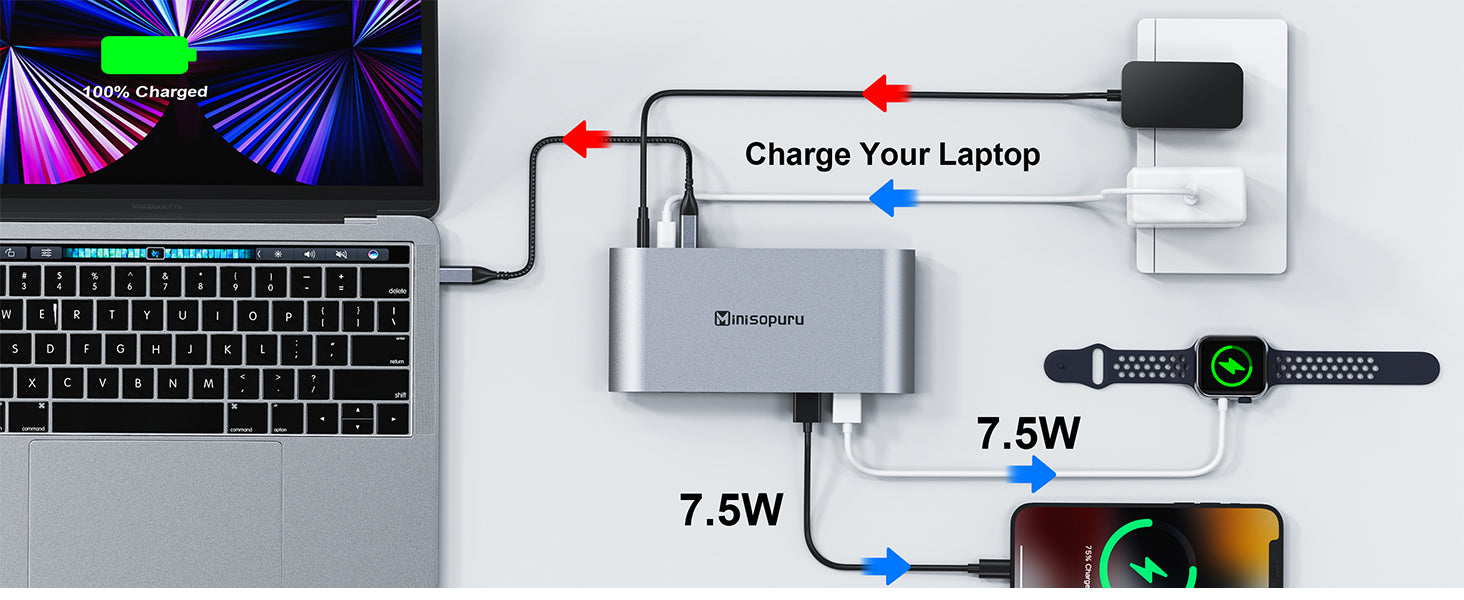
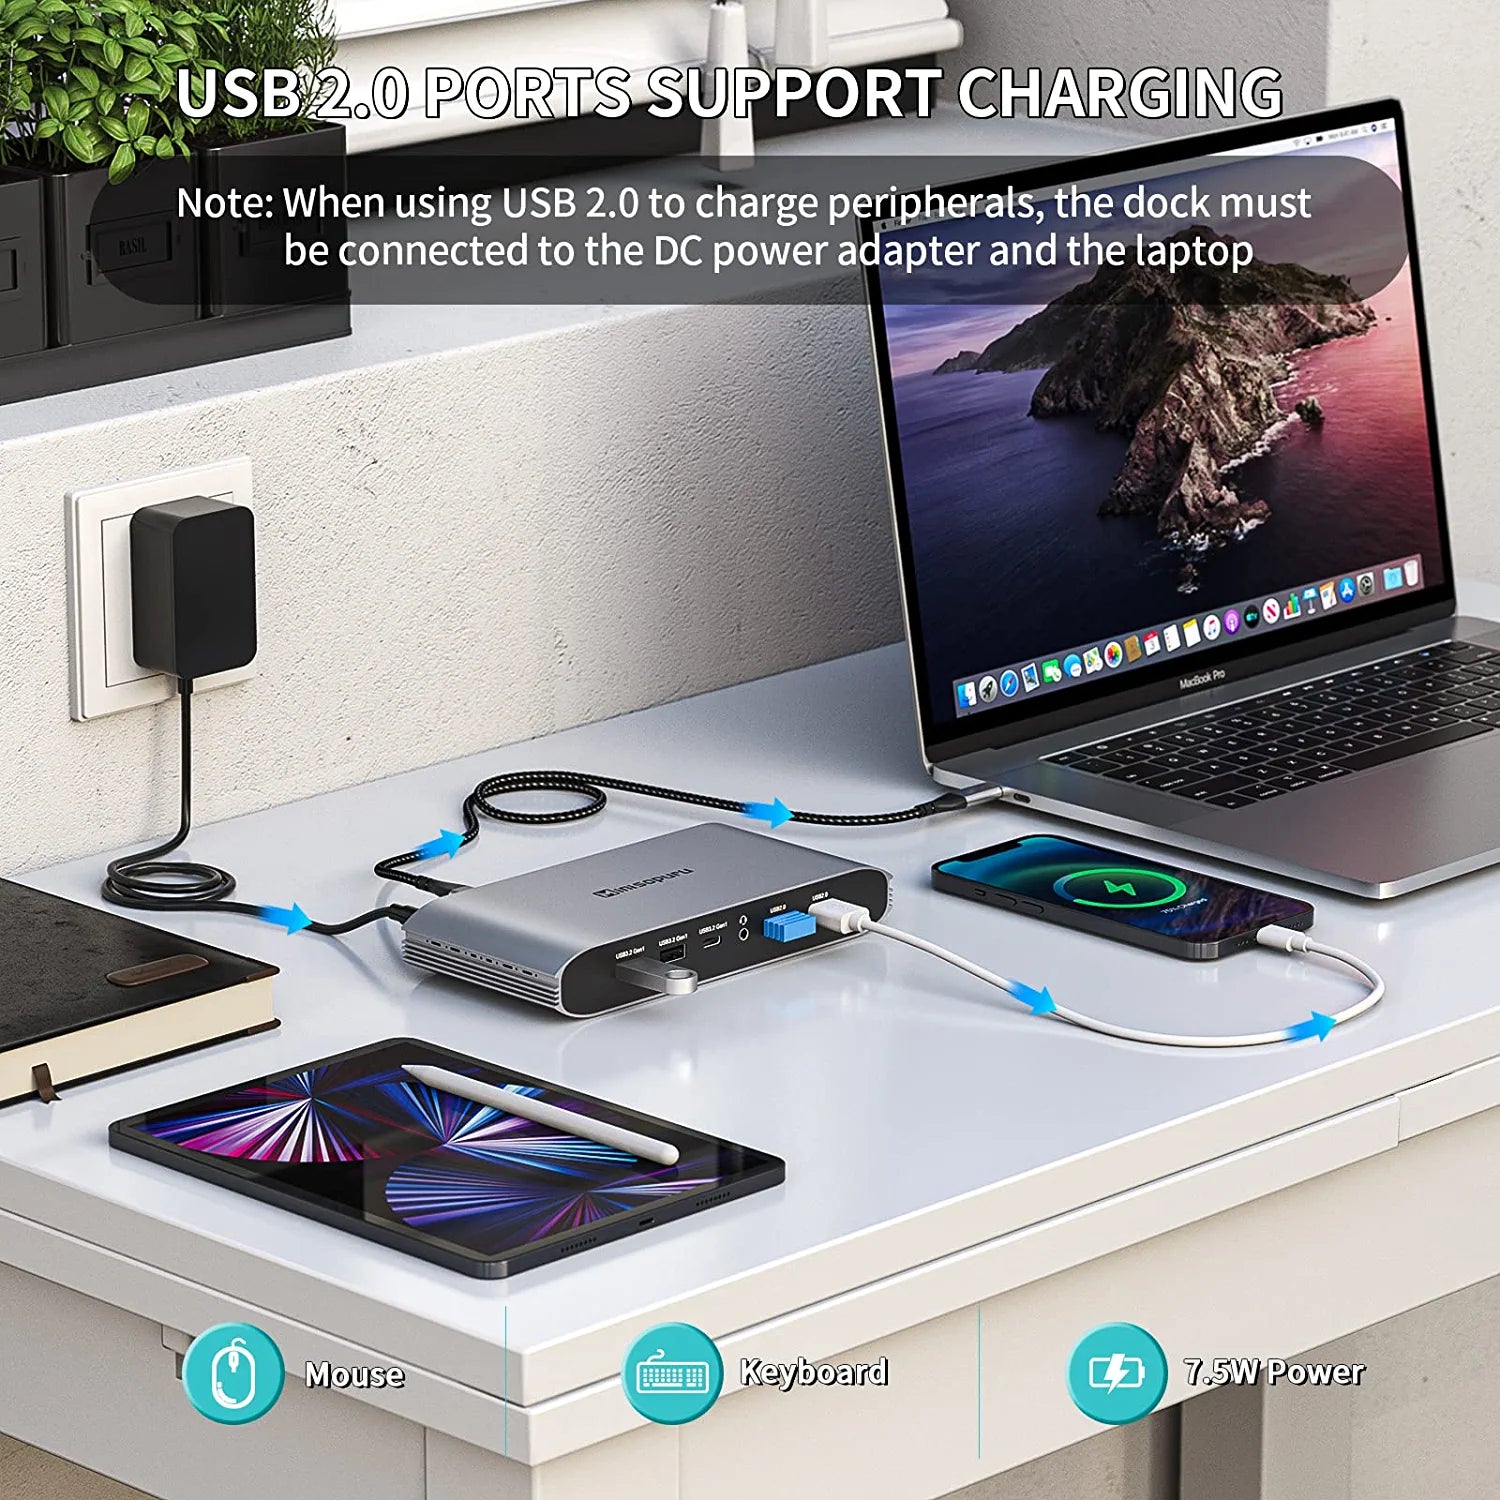
How to Properly Charge Your laptop, Phone and Other Peripherals?

Specifications
2*DP+2*HDMI:
Connect three monitors at 4K@60Hz.
Note: HDMI and DisplayPort ports (display 3) can only pick one of two.

2*USB-A 3.2 Gen1:
Can connect USBA devices such as USB flash drives to transfer data at a rate of 5Gbps

1*USB C 3.2 Gen1
Can connect an external SSD to transfer data at a rate of 5Gbps(Note: USB C 3.2 Gen1 port does not support charging and video output)


2*USB 2.0
Support 7.5W power to charge your phone or other devices and easily connect USB A devices like keyboard, mouse and more

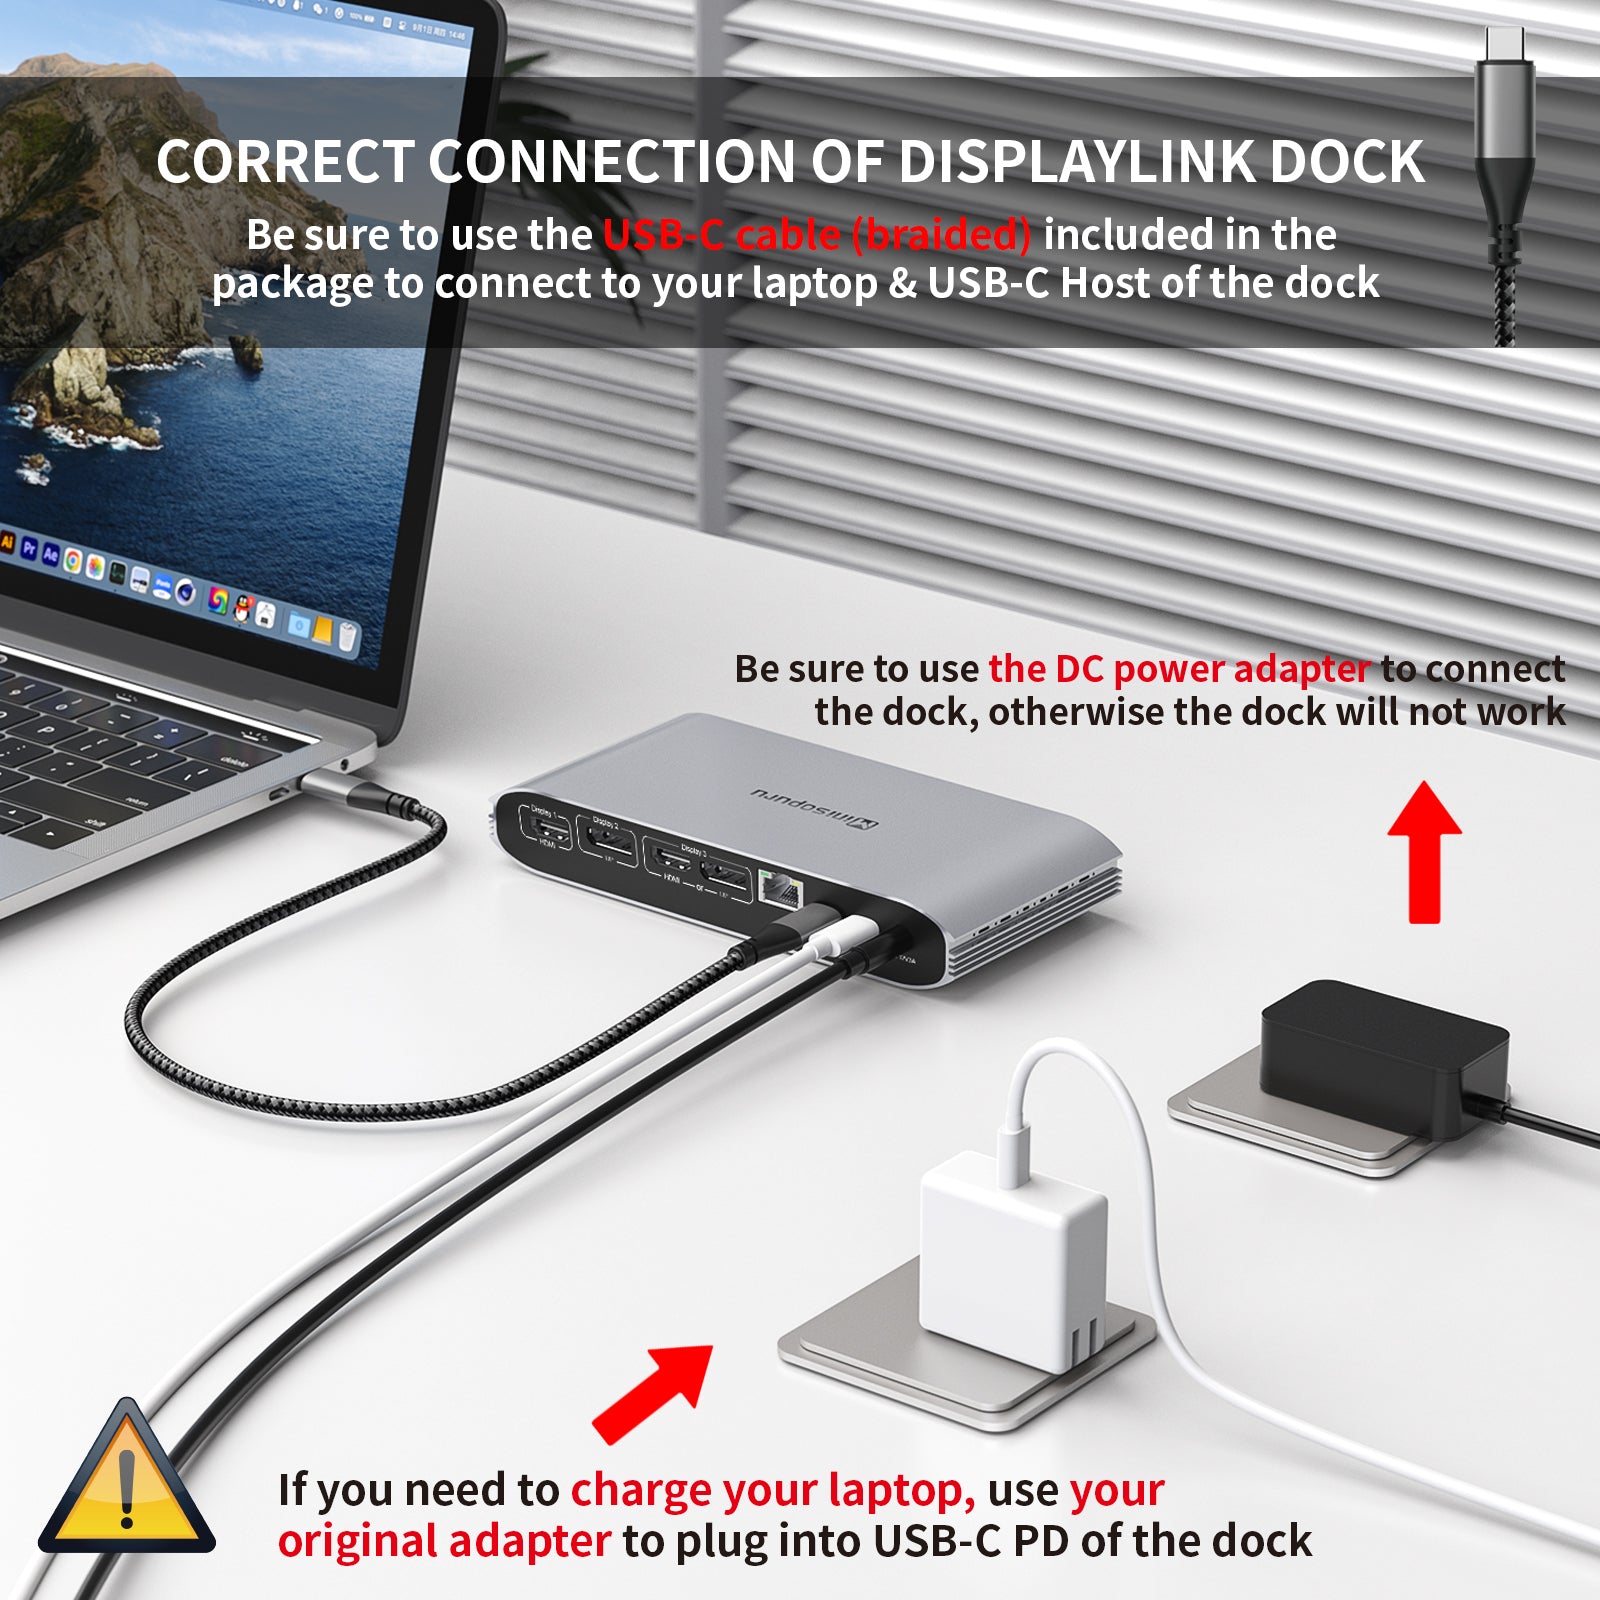
1*USB-C PD
Charge your laptop with 100W output (Note: USB-C PD charging interface does not support data and video output)


1*3.5mm headphone/mic
For listening to music and video chat, ideal for external microphone and video chat

1*Gigabit Ethernet
Experience fast and reliable 10/100/1000Mb network speeds

1*36W DC Power Adapter
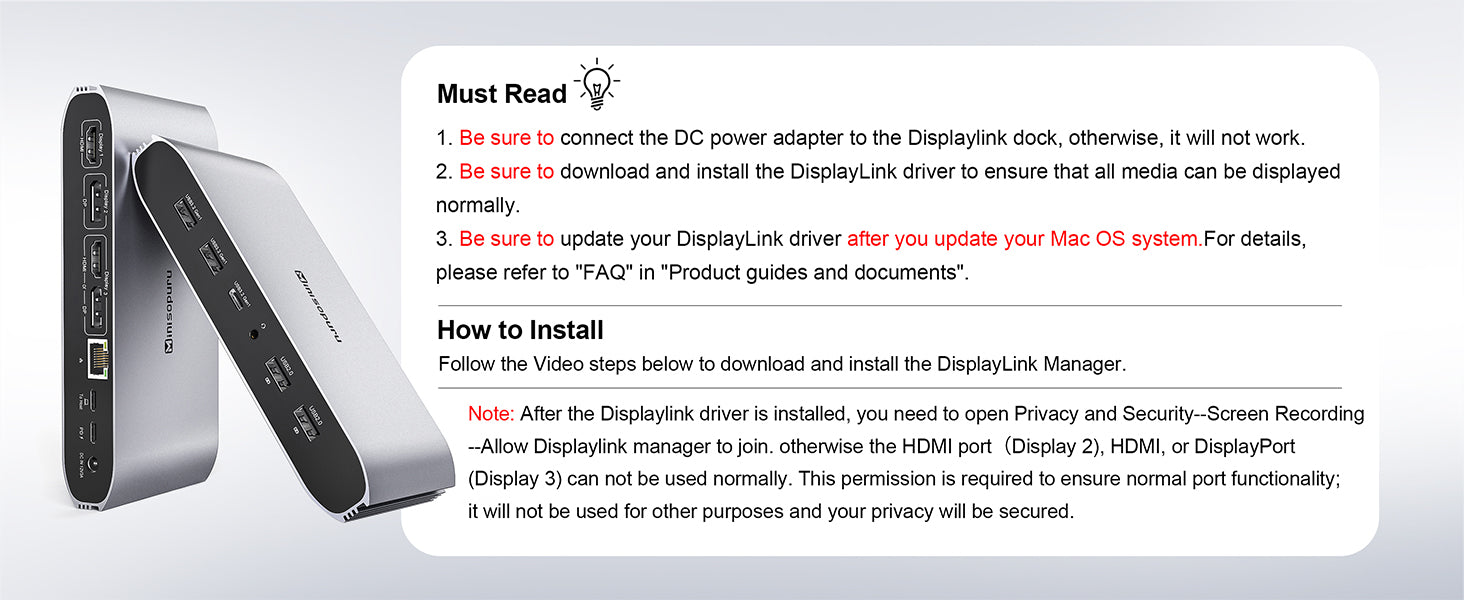
Power the dock (Note: The Minisopuru docking station must connect the 36W DC power adapter to use, otherwise it will not work)
1*USB-C Host
Connect your laptop, iPad or mobile phone etc.


What's in the package?
1*Minisopuru Displaylink dock
1*36W DC power adapter
1*USBC to USBC to host cable
1*USB-C to USB-A converter
1*manual

Get Starter

Windows Installation and Setup

  1. Download and install the DisplayLink software.
  2. Connect the power supply to your wall socket or power strip, and then to the docking station.
  3. Connect the display to the docking station.
  4. Connect the docking station to the computer using the USB cable provided with the docking station.

macOS Installation and Setup

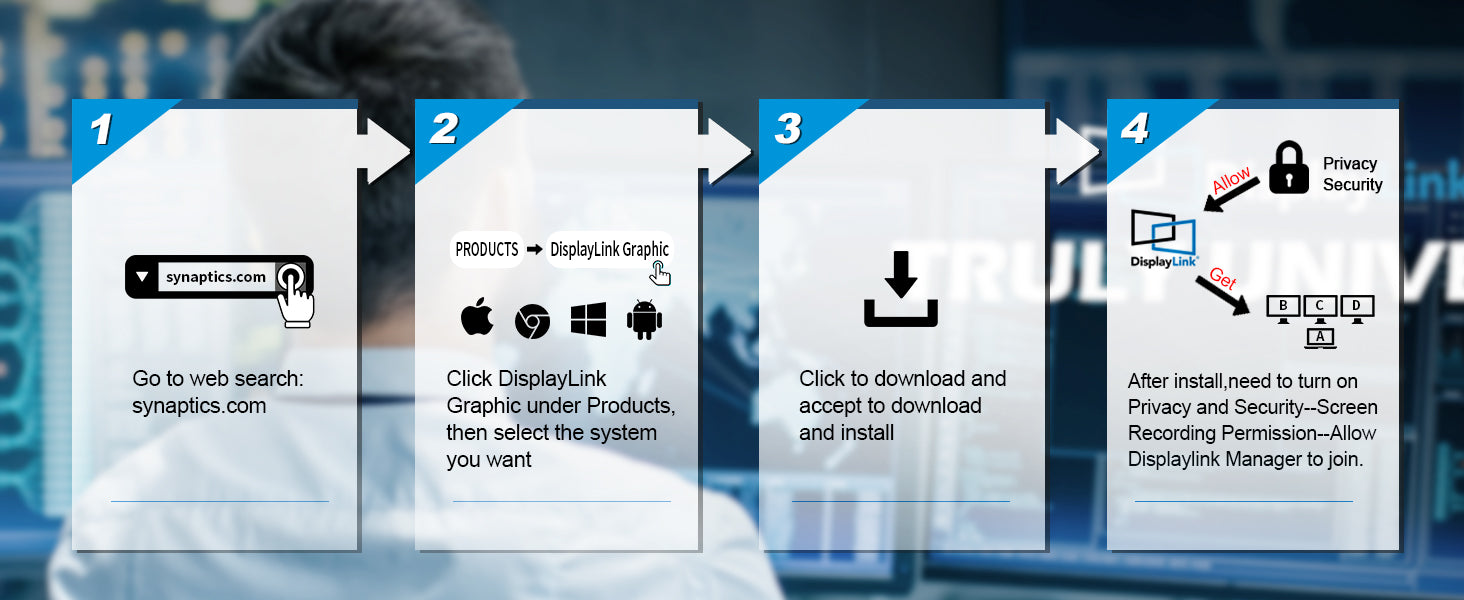
  1. Download and install the DisplayLink Manager for macOS.
  2. Detailed installation and configuration instructions can be found by clicking on the "Help Center" button, or in the next step.
  3. Please follow the detailed instructions below to install and configure the DisplayLink software for your version of macOS:
  4. Connect the power supply to your wall socket or power strip, and then to the docking station.
  5. Connect the display to the docking station.
  6. Connect the docking station to the computer using the USB cable provided with the docking station.

ChromeOS Installation and Setup

  1. No driver download is necessary, through ChromeOS version 100 or later is required.
  2. Connect the power supply to your wall socket or power strip, and then to the docking station.
  3. Connect the display to the docking station.
  4. Connect the docking station to the computer using the USB cable provided with the docking station.

FAQ

Please follow these steps: Privacy & Security > Screen Recording > Allow "DisplayLink manager" to connect. Or refer to the installation video on the details page for operation. If not solved, Please look for minisopuru

If you connect a laptop with a USB-C port, please make sure it is a full-featured USB-C port(with data, video output, and charging functions port),eg:Thunderbolt 3/4,USB4. If you connect a laptop with a USB-A port, NOTE: HDMI1 will not work.

Please use the USB2.0 port to connect your mobile phone to charge. Please refer to the above video for the correct connection method. If still not working, please contact Minisopuru official. Thank you!

DisplayLink uses screen-sharing technology to output images,streaming videos (Netflix) cannot be played due to copyright protection,black screen. can be solved as follows:1. Use Google Chrome; 2. Turn off hardware acceleration in Google Chrome.

Sure, please go to setting preferences: Battery/Displays - turn on "Prevent computer from sleeping automatically when the display is off". If you do not enable this setting, the DisplayLink Dock will not work with the lid closed.
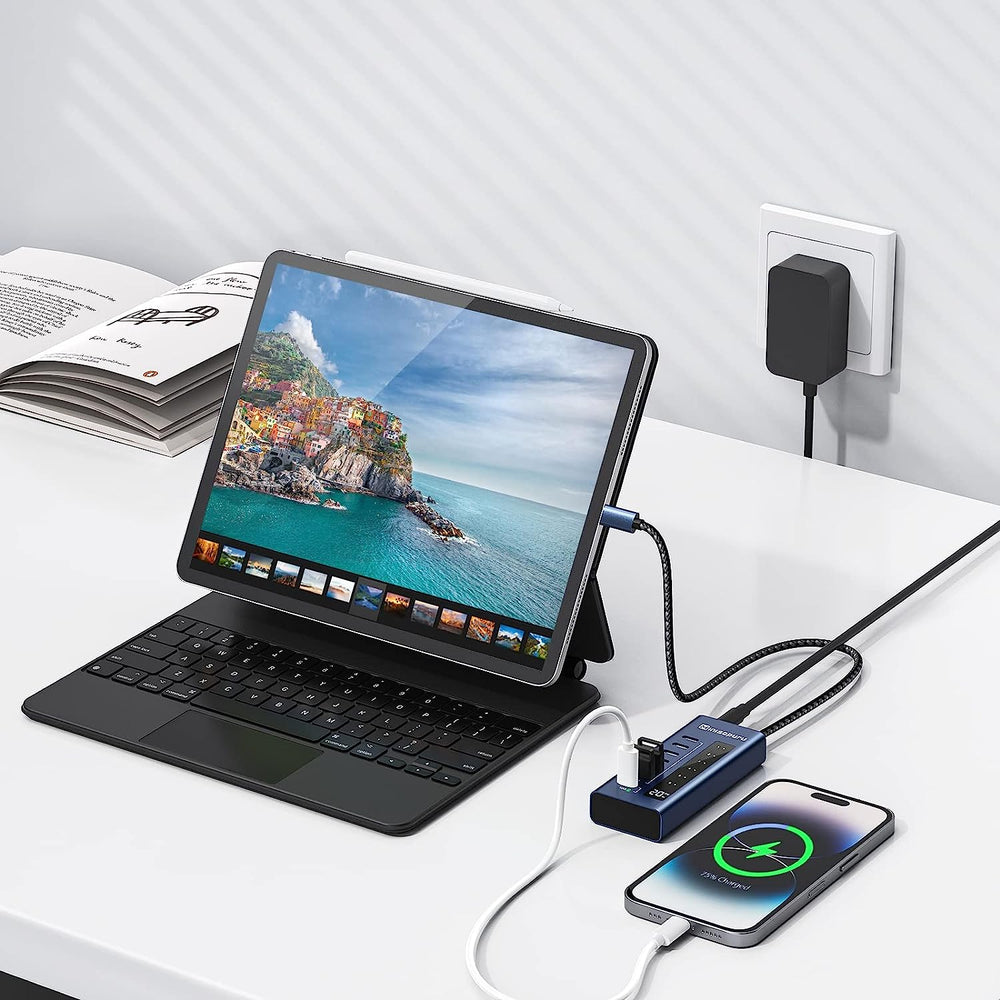
FREE & SAFE SHIPPING

Free Shipping on Orders over $100